728x90
오늘은 이미지 업로드 기능을 구현 해보자

fastapi 공식문서에 나와있는 것 처럼
https://fastapi.tiangolo.com/tutorial/request-files/
일단 python-multipart 를 설치한다.
pip install python-multipart
main.py 상단 fastapi에 File, UploadFile 를 임포트 한다.
from fastapi import FastAPI, Depends, HTTPException, File, UploadFile@app.put("/users/{userId}/img")
async def update_user_image(userId: int, file: UploadFile, db: Session = Depends(get_db)):
return JSONResponse(content={"message": "프로필 이미지가 수정되었습니다."}, status_code=200)로 임시로 적어주고

에 나와있는것 처럼
filename, content_type, file 같은 속성으로 업로드된 파일 가져온다.
    print('filename: ', file.filename)
    print('content type: ', file.content_type)
    print('file obj: ', vars(file.file))
print('file obj: ', vars(file.file._file))로 코드를 수정하고 썬더클라이언트로 파일을 테스트 해보면


이것처럼 가져온다.
write, read, seek, close 의 메소드가 있다
- write(data) : str, bytes 로 데이터를 쓴다.
- read(size) : size 만큼 읽는다
- seek(offset) : offset 만큼 바이트 위치로 이동??
- close() : 파일 닫음

일단 프로젝트 위치에 파일을 저장 하는 방법을 구현할꺼다.
pathlib 에 path를 가져온다
from pathlib import Pathprint('프로젝트 위치: ', Path.cwd())
처럼 프로젝트 폴더를 가져온다.
여기에 images 폴더 하위에 업로드 된 파일 이름으로 저장을 해보자
@app.put("/users/{userId}/img")
async def update_user_image(userId: int, file: UploadFile, db: Session = Depends(get_db)):
    print('filename: ', file.filename)
    print('content type: ', file.content_type)
    print('file obj: ', vars(file.file))
    print('file obj: ', vars(file.file._file))
    print('프로젝트 위치: ', Path.cwd())
    print('path 위치: ', Path.cwd()/'images'/file.filename)
    content = await file.read()
    with open(Path.cwd()/'images'/file.filename, 'wb') as fs:
        fs.write(content)
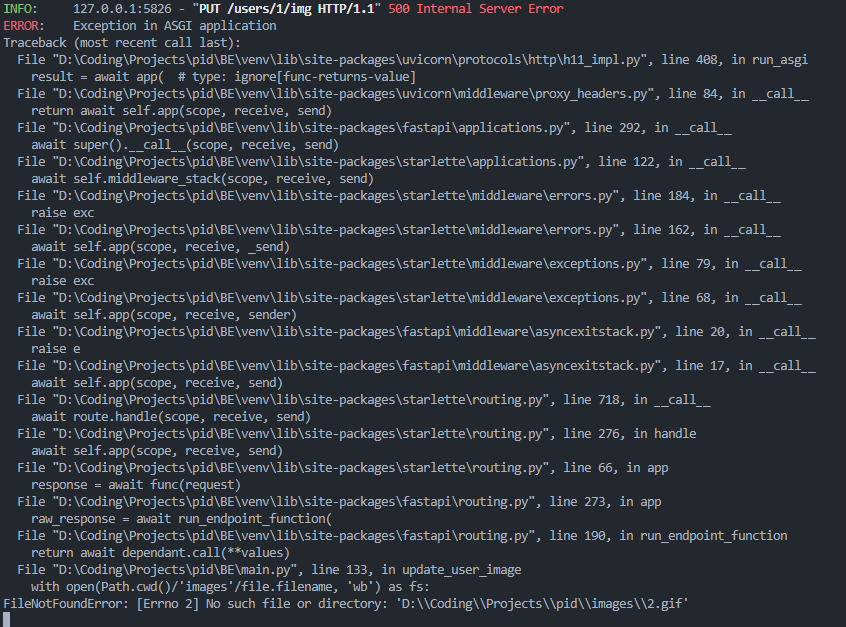
return JSONResponse(content={"message": "프로필 이미지가 수정되었습니다."}, status_code=200)라고 수정하고 실행했더니..

이 처럼 에러가 났다. ㅎㅎ
폴더가 없어서 에러가 나는듯 하다
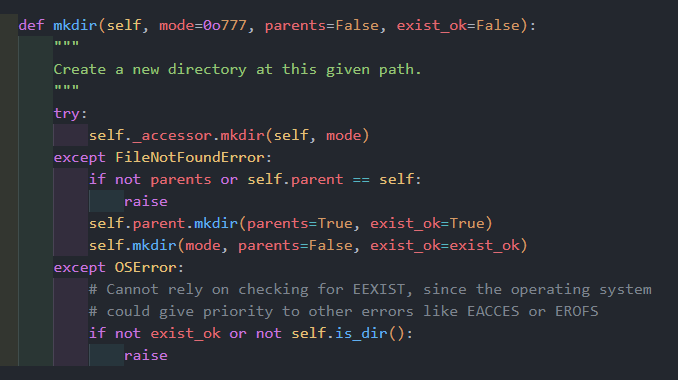
폴더가 없을때 자동으로 만들어주자

에서처럼
@app.put("/users/{userId}/img")
async def update_user_image(userId: int, file: UploadFile, db: Session = Depends(get_db)):
    print('filename: ', file.filename)
    print('content type: ', file.content_type)
    print('file obj: ', vars(file.file))
    print('file obj: ', vars(file.file._file))
    print('프로젝트 위치: ', Path.cwd())
    print('path 위치: ', Path.cwd()/'images'/file.filename)
    file_path = Path.cwd()/'images'/file.filename
    content = await file.read()
    file_path.parent.mkdir(parents=True, exist_ok=True)
    with open(file_path, 'wb') as fs:
        fs.write(content)
return JSONResponse(content={"message": "프로필 이미지가 수정되었습니다."}, status_code=200)했더니 폴더 생성이 잘됐다

이제 해당 유저의 image 컬럼에 이미지 경로를 넣어보자.
main.py
# 상단에 user_image 추가

from BE.crud import create_user, get_user, verify_password, get_user_info, update_user_info, get_models, get_my_models, create_model, get_model, user_image@app.put("/users/{userId}/img")
async def update_user_image(userId: int, file: UploadFile, db: Session = Depends(get_db)):
file_path = Path.cwd()/'images'/file.filename
content = await file.read()
file_path.parent.mkdir(parents=True, exist_ok=True)
with open(file_path, 'wb') as fs:
fs.write(content)
user_image(db, user_id = userId, image = file.filename)
return JSONResponse(content={"message": "프로필 이미지가 수정되었습니다."}, status_code=200)
crud.py
def user_image(db: Session, user_id: int, image: str):
    user = db.query(User).filter(User.id == user_id).first()
    user.image = './images/' + image
    db.commit()
return user로 해서 테스트

성공적으로 들어갔다!!
이 후에 s3 하려고 했는데 기업쪽에서 준 aws iam 권한설정을 안해줘서 내일로.. ㅠㅠ
본 후기는 정보통신산업진흥원(NIPA)에서 주관하는 <AI 서비스완성! AI+웹개발 취업캠프 - 프론트엔드&백엔드> 과정 학습/프로젝트/과제 기록으로 작성되었습니다.
'코딩캠프 > AI 웹개발 취업캠프' 카테고리의 다른 글
| [AI 웹개발 취업캠프] 70Day - 프로젝트 21일차 (0) | 2023.10.30 |
|---|---|
| [AI 웹개발 취업캠프] 69Day - 프로젝트 20일차 (0) | 2023.10.27 |
| [AI 웹개발 취업캠프] 67Day - 프로젝트 18일차 (0) | 2023.10.25 |
| [AI 웹개발 취업캠프] 66Day - 프로젝트 17일차 (0) | 2023.10.24 |
| [AI 웹개발 취업캠프] 65Day - 프로젝트 16일차 (0) | 2023.10.23 |
